
2- Week Hasty indoctrination
Getting a new team member or sending an existing one off to school can be the most stressful time for a Sniper Section leader.
This training plan is designed to ensure snipers are prepared for military-style sniper training. This training isolates key tasks necessary to be successful in a military-style sniper course. The calendar serves as a guideline for a two-week (10-day) train up that includes approximately 40 hours of training, with each day not exceeding 4 hours. The benefit of 4-hour training days allows emphasis on daily duties while preparing for a course. Week One training establishes the importance of a creative mindset and productive behaviors.
Furthermore, Week One assists snipers with the highest attrition rates in fieldcraft tasks. During Week Two, the snipers learn how to utilize a rifle in several scenarios. It establishes successful habits prudent to primary and intermediate rifle marksmanship. In addition, week two evaluates if a sniper is proficient in operating sniper weapons systems with varying levels of stability. By the end of this period of instruction, each sniper should be able to understand and successfully navigate the key tasks necessary for success in any military-style sniper course.
2- Week indoctrination overview
40 hours across two weeks.

Fieldcraft week
First begin with the absolute basics. Create a ghillie and be be able to detect a target and estimate the range. The remainder of the week focuses on becoming proficient in the act of infiltrating a given environment
Marksmanship week
Now that we have a good grasp on locating an objective, we move on to what to do in order to neutralize it. Beginning with basic carbine handling, and then moving on to larger weapons in increasingly challenging situations.
Week 1 breakdown

Day 1
If you have proteges looking to go to their qualifying course, it is reasonable to expect a completed ghillie suit with all the trimmings (Veil, Top, Bottoms, Drag-bag). But if you are looking to onboard some newly selected snipers, this can be exchanged for a class on constructing a ghillie suit.
The target detection familiarization should be standardized for both onboard and those looking to go to school. Teach them the fundamentals and walk them through what a graded event will look like for their respective course.
Sector Breakdown will be a crucial concept of sniper pairing. this should be discussed and solidified before any range time, which is why it is placed here on day 1. There are many methods to choose from to accomplish this task, ensuring that they know the fundamental process and can remain flexible so they may work with any partner.
Target indicators are the last classroom instruction taught on day 1. Size, Shape, Contrast, Outline, Citing, Sound, Movement… etc., should all be discussed, so the protege understands.
A practical exercise may be done either before or after any formal instruction. If done before- it shows the importance of formal training. This makes them far more receptive to learning. If done after- it allows for the information to be freely used while training the skills.
Day 2
Range Estimation accounts for a significant number of misses, both in real life and in a training environment. Data shows that if your calculations are more than 40m off in either direction, the hit probability will drop by 17 or more percent.
Range Estimation familiarization needs to be taught so all concepts can be used for the practical exercise. Ensure that each protege understands the eight methods of range estimation. Now it is time to put that information learned to the test. Find a stretch of land that is 600m long (a little over a quarter of a mile) and begin walking them through the thought process necessary to make educated assumptions regarding distance. Allow some time to make both observations and guess the distance before giving the proteges the correct distance.
Then move back into a classroom environment and teach them how to use the Etched reticles that may be encountered( For the US Army: AGR-4, AGR-6, TMR, MILDOT, H58) followed by a thorough class on how to execute the mil-relation formula.
Day 5
The instructional portion consists of Transplanting, Loophole and Blending.
Transplanting is a simple concept to understand but a hard one to master. Ensure you teach the proteges about where to get the vegetation from, how long it will last, and
how to place it.
Next is visual and ballistic loopholes within a rural (read forested or heavily vegetated) area. The sniper needs to know the difference and how to maintain a patent visual and ballistic loophole, even in windy conditions, without making it too large.
The most accessible concept to teach of the day will be blending. What colors should the snipers be using in a given position? This skill also has a very low barrier to entry; but a very high skill cap. Take your time and teach them thoroughly.
Make sure to end this week with a practice stalk if time permits. Walking sequence and all. Blanks for the M110 are hard to come by for FORSCOM, so be creative with your audible signature.
Day 4
We start and end this day in the woods.
Everyone ghillie up and head out into the woods. Take a bright orange hunting vest or some other training aid out there and a 12-inch by 12-inch board with a roughly 6-inch letter on it. Teach the young snipers what a tree stack looks like and how to use it. Make sure that you are informing them of the differences between a proper tree stack and a bowling alley.
Then we move on to screens and teach them about both natural and artificial screens. There is a time and place for both. Remember, the biggest downside to using artificial screens at the schoolhouse is that equipment is an extension of you... if it is seen, then so are you.
Lastly, talk to them about FFP selection, what makes a good spot, what makes a bad spot, and how to make a mediocre spot into something extraordinary. Use transplantation and screens, and teach them how to blend into their desired location truly.
For Day 4 specifically: movement techniques should be harped on and reinforced. Use all of them at least once and ensure they know when to use each style.
Day 3
Although there are only two items on the docket for day three does not mean you can’t fit 4 hours’ worth of instruction in there. Terrain analysis dually impacts a sniper’s mission. First, it changes their mindset on a good path while traversing the battlefield. Second, it allows them to aid commanders better using the acronym OAKOC. Teach them early how to look at how things impact friendly and enemy forces. Also, teach them to use Terrain, Vegetation, Structures, and Tactical value (TVST) analysis for route selection. This will filter what can and cannot be used as “Cover and Concealment” while infiltrating.
Week 2 breakdown
Day 6
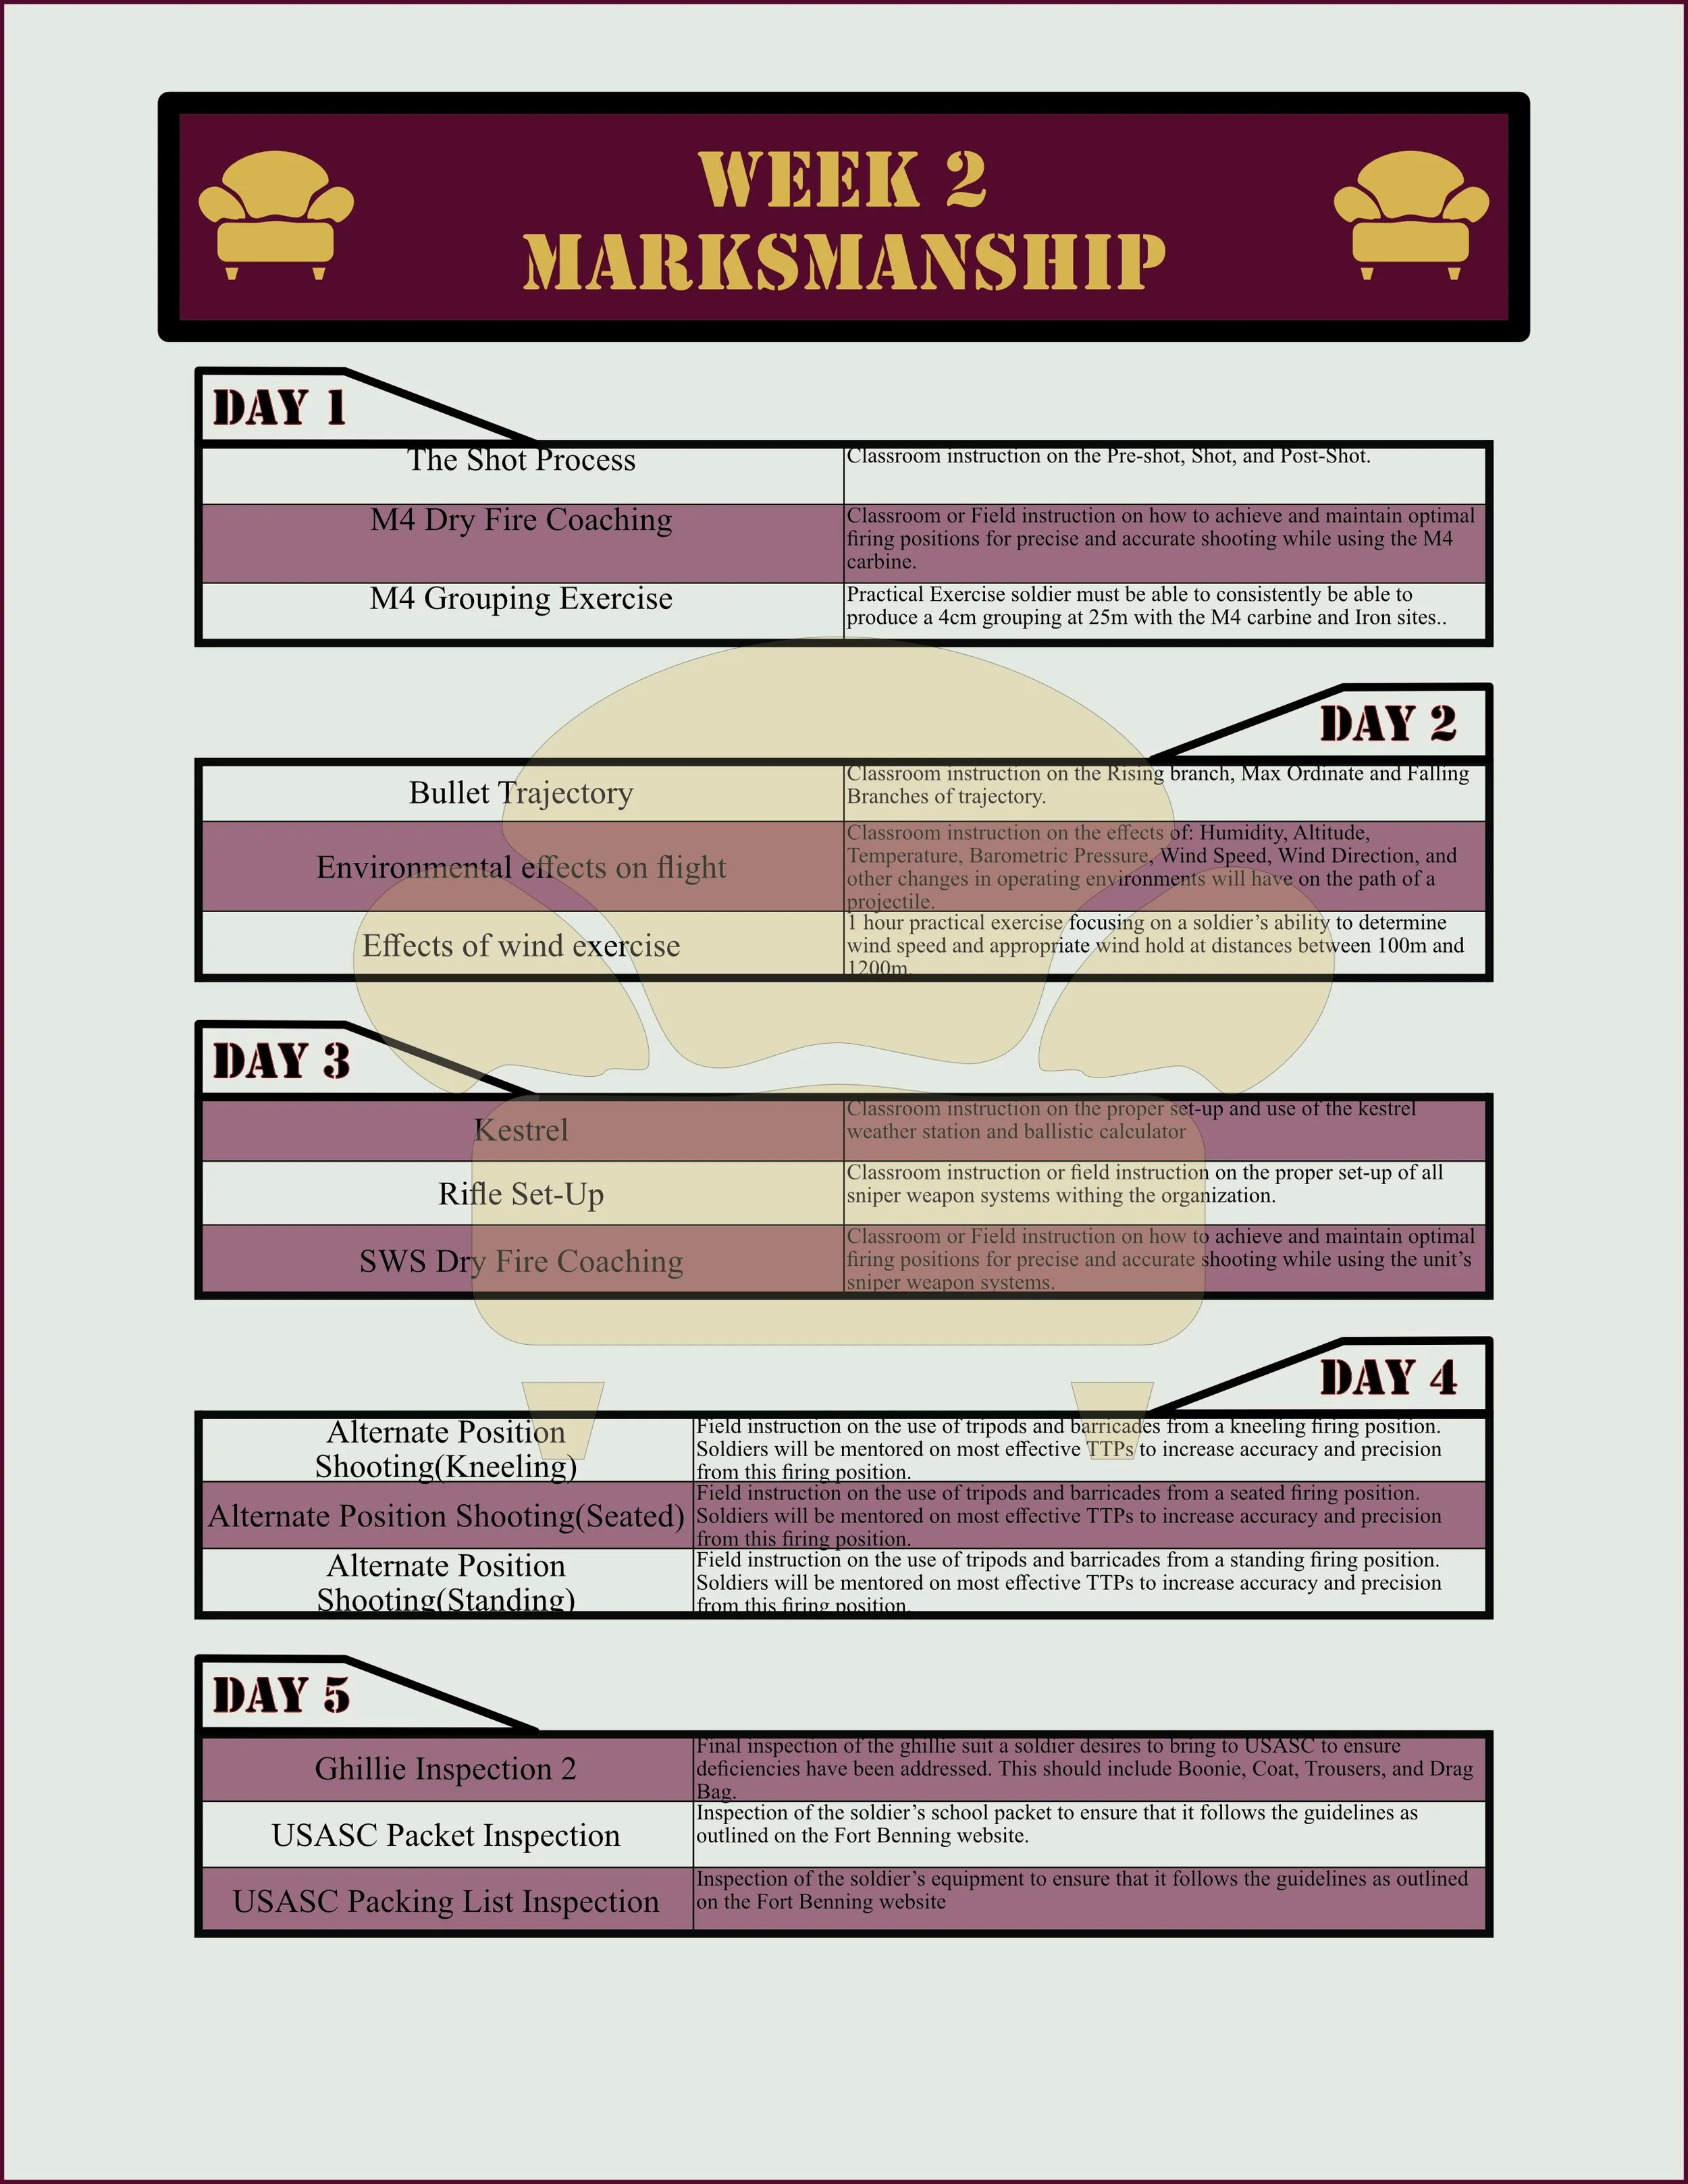
This week ensures that each protege is prepared to pass the marksmanship assessments at their respective qualification course. USASC has a barrier to entry with the M4 carbine explicitly. This task is known as “Group-in.” 5 shot groups of 5 are shot at a distance of 25 meters with an M4 using only iron sights. All five rounds must fit within a 4CM circle to be considered a group.
To ensure your proteges can accomplish this(or a similar task), teach them all 11 elements of the Shot process. Then watch them as they dryfire in an effort to improve the skills they already harness.
Day 7
You can call this day “External Ballistics Day.” Every portion of the classroom instruction revolves around what the bullet is doing once it leaves the shelter of the barrel. Ensure they understand the branches of the trajectory (Rising, Max-ord, Falling) and how different environmental factors can affect projectile performance.
Wraps the day up with a class on the wind and how to evaluate the wind with the Beaufort scale or the Kestrel. Make them use the short wind formula and come up with a solution!
Day 8
Range preparation is the name of the game on this day. Teach them how to use the Kestrel and their Automatic Ballistic Calculator(ABC) if applicable. Then move into how to set up a rifle—taking into consideration: Comb Height, Length of pull, scope shadow, Diopter adjustments, and overall comfort. Take that newly set rifle and have them dry fire at targets, preferably at something with feedback like a dry fire simulator.
Day 9
Range Day! Get out to the range and confirm the data you received from your ABC or Kestrel Weather Station. If you have limited resources, focus on confirmation of data in the prone and kneeling/standing if time or resources is of no consequence. Go in with a PLAN and execute.
Remember, the proteges still need to see how wind affects the round and how unstable they can be in different positions. They must trust they know the appropriate data to place on the weapon for a given distance and that the can manipulate it to get there.
Day 10
Final conditions check for the qualification course. Recheck the ghillie that you critiqued on day 1. Also, ensure that all paperwork is completed and presentable. They will be at the qualification course the following week in a perfect world.
If this train-up is for a newly onboarded team member, Use this time to ensure they know the team’s standards and to counsel them on the future.